

Jewelry product photography is essential for showcasing the true beauty and craftsmanship of every piece. It directly impacts sales, online visibility, and brand perception in a highly competitive market.
Clear, sharp, and elegant images help customers visualize the jewelry’s quality and detail. Bad photography can lose a sale, while great visuals can build trust and drive conversions.
This guide breaks down tools, lighting, and jewelry photography techniques for beginners and pros alike. Whether you’re using a smartphone or DSLR, you’ll find valuable strategies to level up your images.
You don’t need expensive gear to begin. With the right knowledge, setup, and editing tricks, even beginners can produce professional, eye-catching jewelry photos at home.
How to photograph jewelry begins with the right lighting. Use soft, diffused light from natural sources or light tents to eliminate harsh shadows and unwanted reflections on shiny surfaces.
Lightboxes and softboxes are excellent tools for achieving uniform illumination. Proper lighting ensures your pieces sparkle and highlight every intricate detail clearly and professionally.

A macro lens is ideal for photography jewelry, capturing fine textures and gemstones up close. Pair it with a tripod to maintain stability and avoid blur, especially with close-up shots.
Before each shoot, clean your jewelry to remove fingerprints or dust. Carefully style each piece using stands or props. In post-production, enhance sparkle, sharpness, and color balance for polished results.
Your jewelry photography setup doesn’t need to be complex. Whether you use a studio or home corner, choose a clutter-free, well-lit space with a clean surface and neutral backdrop.
Camera placement matters for jewellery photography.
Use eye-level or angled shots for earrings and pendants. Overhead angles work well for rings and bracelets to show details clearly.

A tripod is essential in photographing jewelry. It keeps your camera steady, helps maintain consistent framing, and allows sharper focus, especially when shooting in lower light conditions.
Experiment with props, lighting, and backdrops until you find your best look. Always shoot multiple angles. Sometimes, the perfect jewelry image comes from trying something slightly unexpected.
Choosing the best camera for jewelry photography is important, but it doesn’t mean buying the most expensive gear. Entry-level DSLRs, mirrorless cameras, and even modern smartphones can deliver great results.
DSLR and mirrorless cameras offer manual controls and high-quality sensors for jewelry photography. Smartphone cameras are more convenient but may lack flexibility for advanced lighting and lens options.

Look for features like high resolution, manual settings, and RAW format support. These allow better control over lighting, color, and detail during your jewelry photography tips workflow.
Beginner-friendly cameras like the Canon EOS Rebel or the Sony ZV-E10 work well. Learn how to maximize your device—techniques matter more than price when it comes to professional-looking jewelry photos.
Using the best lens for jewelry photography makes all the difference in capturing intricate details. A macro lens is ideal for shooting small, reflective objects like rings, necklaces, and gemstones.
Macro lenses allow close focusing without distortion. For a photography necklace or earrings, a 100mm macro lens provides clarity and sharpness while maintaining distance to prevent shadows and reflections.

A wider aperture (like f/2.8) creates a soft background blur, highlighting your subject. But for full focus, especially in creative jewelry photography, use a smaller aperture like f/11 or higher.
You can also use a 50mm prime lens if you’re starting out. It’s versatile and sharp, giving beautiful results while learning how to handle depth, light, and focus for jewelry shots.
Choosing the best background for jewelry photography helps your product stand out. Clean, neutral backgrounds—like white, black, or gray—keep attention on the jewelry and ensure a professional look.
For jewellery photoshoot themes, textured surfaces like marble, velvet, or wood can add richness. These materials create mood without overwhelming your subject, which is ideal for storytelling and lifestyle product shots.

Avoid busy or colorful backgrounds that compete with your jewelry. Even subtle patterns can distract from fine details or create color imbalances in your jewelry photography results.
The goal is to let your jewelry be the hero. A well-chosen background enhances elegance and supports your brand identity without pulling focus away from the product itself.
The best props for jewelry photography complement the product without overpowering it. Think soft fabrics, velvet boxes, acrylic stands, or flowers—props that enhance elegance and visual storytelling.
In jewellery photography ideas, props help create a mood or lifestyle context. Use neutral tones or textures to avoid clashing. The goal is to support, not steal attention from, your jewelry.

Limit props to one or two elements per frame. Overloading can clutter your composition and distract the eye. Clean, minimal styling makes your jewelry look high-end and professional.
Every item should serve the shot’s purpose.
A well-placed prop in jewelry photography adds depth and emotion—just remember, the jewelry must always remain the visual and emotional focal point.
Choosing the best backdrops for jewelry photography sets the mood. A seamless white, black, or neutral backdrop is a timeless choice that ensures your product remains the visual centerpiece.
Textured or DIY backdrops—like linen, marble tiles, or wood boards—work well in lifestyle jewelry photography. These add personality and contrast, helping connect the jewelry to your brand’s story.

Make sure your backdrop is clean, wrinkle-free, and non-reflective. In jewelry photography, backdrops shouldn’t compete with the jewelry. Instead, they should support the composition and overall elegance.
Great backdrops are subtle, not distracting. A solid visual foundation allows lighting, jewelry, and styling to shine, creating cohesive, gallery-worthy images that look polished and professional across all platforms.
Lighting is the most important part of jewelry product photography. It defines how your jewelry shines, how textures appear, and how attractive the final photo looks to potential buyers.
Use natural daylight or soft artificial light to avoid glare. In jewelry photography, diffused lighting softens reflections and enhances the sparkle of gemstones and polished metal surfaces.

Try side lighting or backlighting for added depth. Reflectors help bounce light into shadows, while diffusers spread light evenly—essential techniques in high-end photography jewelry results.
Avoid harsh, direct lighting which causes overexposure. Instead, experiment with LED panels, ring lights, or softboxes to find the right glow that makes your jewelry truly dazzle.
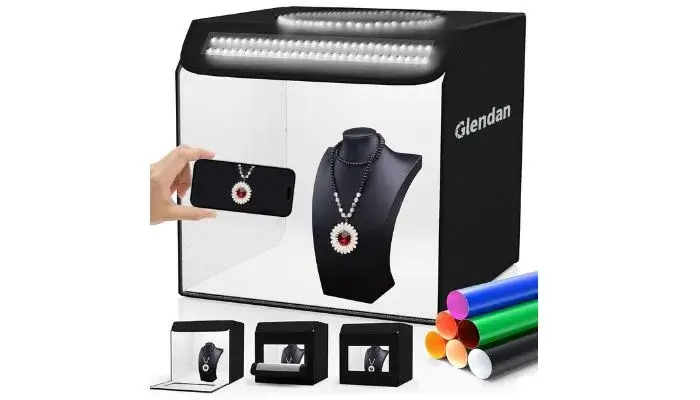
Lighting is everything in a lightbox for jewelry photography.
A lightbox creates even, diffused lighting that removes harsh shadows and reflections, ideal for capturing jewelry’s shine and intricate details.
Using a softbox or LED ring light around your lightbox enhances the sparkle of gemstones.
Proper jewelry photography lighting helps gold, silver, and diamonds appear more vibrant and luxurious.
Reflectors can help bounce light onto dark areas of the jewelry. Side or backlighting often brings out textures and makes the photography jewelry look more dimensional and realistic in your images.
Avoid overhead lighting or direct flashes, which cause glare and flat images. Lighting setups make a massive difference in elevating your jewelry from amateur shots to professional quality.
Jewelry photography for Instagram must be eye-catching and scroll-stopping. Focus on sharp images, proper lighting, and clean compositions to stand out on a visually saturated platform.
Shoot square or vertical formats to fill more screen space. For jewelry lifestyle photography, show your product in use—on models, in daily settings, or styled for a specific occasion.

Use consistent editing styles to build brand identity. Filters should enhance, not overpower, your jewelry’s natural look.
Cohesive aesthetics increase engagement and follower trust in your jewelry photography feed.
Add relevant hashtags, alt text, and compelling captions. High-quality visuals paired with smart strategy can significantly boost reach, visibility, and sales directly from your Instagram jewelry showcase.
A tripod is a must-have tool in jewelry product photography.
It eliminates camera shake, ensuring sharper images, especially when shooting at slow shutter speeds or in lower light conditions.
In a jewelry photography setup, stability is everything.
A tripod locks your frame, helping maintain consistent composition and focus across multiple shots of rings, earrings, or necklaces.

Use a tripod when styling or retouching live. It keeps your hands free to adjust props and lighting without ruining the angle or blur, which is critical in photographing jewelry workflows.
Look for a tripod with adjustable height, stability, and a quick-release plate. Investing in one is essential for anyone serious about capturing clean, crisp jewelry photos every time.
Jewelry photography with model brings your product to life. It helps customers visualize how pieces look when worn, adding emotion, context, and lifestyle appeal to your photos.
Work with models who suit your brand’s style. In jewelry product photography, natural poses, close-ups, and soft expressions let the jewelry remain the star of the image.

Use soft, even lighting to avoid skin shine and reflections. Keep the model’s clothing neutral so it doesn’t compete with the jewelry. Simplicity enhances elegance in jewelry photography.
Model shots are perfect for ads, catalogs, and social media. They boost engagement and trust by showing real-life scale, movement, and the emotional connection jewelry creates.
The best camera app for jewelry photography gives you manual control over settings like ISO, shutter speed, focus, and white balance—essential for capturing accurate color and sharp details.
Apps like Halide, ProCamera, and Lightroom Mobile are popular among iPhone users.
These tools offer RAW support, which is great for high-quality earrings photography and gemstone clarity.

Using manual settings lets you adjust exposure precisely for reflective surfaces.
This control is key in jewelry photography, especially when dealing with mixed lighting or intricate design textures.
For beginners, try apps with focus peaking and grid overlays.
They make it easier to frame, focus, and expose shots properly, turning your smartphone into a serious jewelry photography tool.
Jewelry photo retouching services polish your images to perfection.
They remove dust, scratches, and blemishes—ensuring your pieces look flawless, luxurious, and ready for high-end presentation online or in print.
For consistent jewelry photography results, retouching adjusts brightness, contrast, and color balance.
These subtle improvements help create images that are sharp, clean, and visually appealing across all platforms.
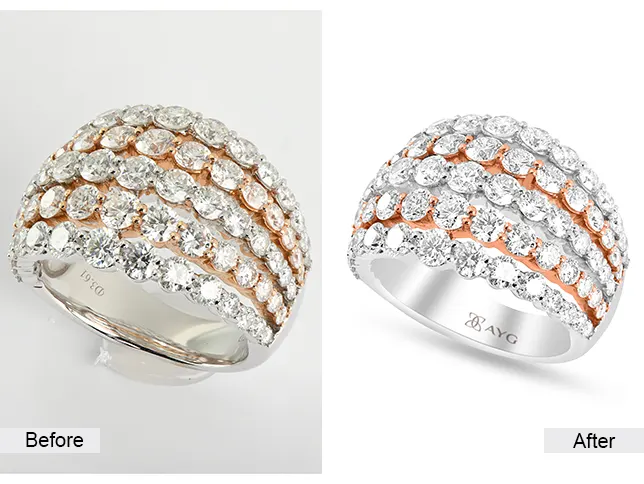
Professionally edited photos increase customer trust and boost conversions. Clean visuals show craftsmanship and attention to detail—essential in jewellery photography for online stores and social media marketing.
Retouching also ensures brand consistency.
Whether you’re showcasing earrings or rings, a uniform editing style keeps your product gallery looking cohesive, premium, and worthy of a second glance.
Mastering jewelry product photography doesn’t require a massive budget—just the right techniques, setup, and tools.
From choosing your camera and lens to creating stunning compositions with backgrounds, props, and apps, every detail matters.
With consistent practice, even beginners can achieve professional results.
Whether you’re shooting for social media, e-commerce, or a personal portfolio, sharp and beautiful images will elevate your jewelry brand.
Jewelry photography is both technical and creative. Embrace the learning process, experiment with new ideas, and keep refining your skills to create scroll-stopping images that sell and inspire.
The best lens for jewelry photography is a macro lens, typically a 90mm or 100mm. It allows you to capture sharp, close-up details of small items without distortion.
Yes, a macro lens is highly recommended. It helps you focus on fine textures and close-up elements like gemstones and engravings with sharpness and minimal blur.
Use diffused lighting, a light tent, and white foam boards around the jewelry. These reduce harsh reflections. Shoot at an angle, not straight on, to minimize glare.
Use transparent threads, command hooks, or acrylic risers. For necklaces and earrings, hang them on a neutral stand or clamp, then remove support digitally during editing.
Natural light is great, especially near a large window with a diffuser. It creates soft, flattering illumination. However, artificial light provides more consistency and control.
Use a DIY lightbox, neutral backdrops, and diffused lighting. With proper angles and editing, you can create professional jewelry lifestyle photography at home.

Ron Jonas
About Author
Hi there, I’m Ronald Jonas – A photography specialist, Blogger. Portland, Oregon Area, USA.


